Integrated Flowsheets in SOAP 2.0
WebPT’s Integrated Flowsheets in SOAP 2.0 allows you to document a patient’s treatment and activities within the SOAP note.
Key terms:
- Activities: Exercises to be completed via hands-on in-person therapy.
- Interventions: Interaction of the PT (or others involved in care) with the patient designed to improve movement, reduce pain, restore function and prevent future loss of mobility.
- Modalities: Energy treatment tools used to produce a therapeutic response such as Ultrasounds, Icing, Heating, etc.
Flowsheet documentation carries forward from one note to the next, recording performed exercises and measurement values.
In this Article
Therapist Aide Flowsheet Documentation
Flowsheet Documentation
- In the Flowsheet section, select Activities/Interventions.

- Select the Precautions field to document conditions that may impact the patient during rehabilitation treatments.

- Enter keywords in the search bar or use the checkboxes to select the patient's precaution(s). Precautions should be taken into consideration when assigning interventions and modalities.

- Click Add activity to open the Activities Drawer.

Note: Click Add flowsheet from profile to open the Content Drawer and search for the desired profile. With profiles, activity details (Procedure Type, Sets, Reps, etc.) can pre-populate to save documentation time. To learn more about creating profiles for flowsheets, click here. 
- On the Interventions tab, enter keywords in the search bar and select the checkbox(es) to document the desired interventions.

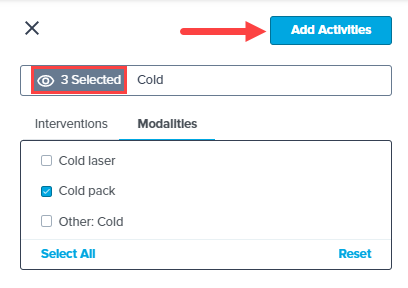
- On the Modalities tab, enter keywords in the search bar and select the checkbox(es) to document the desired physical therapeutic agents.

- Click the Selections icon to review all selected Interventions and Modalities. Once you are satisfied with your selections, click Add Activities.
- Interventions: Use the drop-down menu to select the Procedure Type, this links the exercise to the related CPT Code. Enter the Resistance, Sets, Reps, Hold, Rest, and Duration in the appropriate text fields.
Note: Exercises cannot be billed without the Procedure Type selected. 
- Modalities: Enter the Location(s), Position, and Duration in the appropriate text fields. Duration is used to calculate the total number of units to include in the Charge Summary.

- Use the following options to edit the activities:
- Select the Menu [=] icon to rearrange the activities.
- Select the Pencil icon to edit activity details. Depending on the activity selected, you may have additional data entry fields.
Note: Exercises with a Discontinued status will not carry forward to subsequent notes. - Select the Trash icon to delete an activity.

- To complete an activity, select the Check icon for the appropriate activity, then enter the Minutes in the Billable Procedures section.
Tip: The Minutes entered in the Billable Procedures section will automatically populate in the Charge Summary section. 
- Click the Send to Charge Summary button to add all completed activities to the Charge Summary section.

Note: All Activities added, including those not check-marked, will carry forward to the next notes. However, only the activities marked with the green checkmark will appear in the summary. - Preview your selections before finalizing the note. Once an activity is complete, it will appear in the preview, as well as on the finalized note.

- Your Flowsheet information will automatically populate in the Charge Summary section with the CPT code.
Important: - The number of Units is automatically calculated based on the 8 minute rule for insurances, with either the Rule of 8s or 8-Minute Rule set up, otherwise the Units calculated default to 1.
- If the patient has two insurances with different settings, your Payer Rules Company Setting will determine which rule is followed.
- Your Flowsheet information will appear in the Flowsheet section of the finalized note and will carry forward on the next note. Activities are grouped by Procedure type.


Therapist Aide Flowsheet Documentation
Clerical users such as therapist aides or techs can document flowsheets on behalf of the therapist, including adding precautions, exercises, type of therapeutic activity, and exercise details.
- Clerical users can click on any case that is "In Progress" or finalized to begin flowsheet documentation.

- Once a case is opened, clerical users are restricted to viewing only the flowsheet subsection of the case.

- Clerical users can use all Flowsheets documentation functions listed in this Article.

- When the flowsheet is complete, the clerical user will use the Save and Exit option. The therapist will have to finalize and close the note.


Custom Activities
If you cannot find the exact Activity you are looking for, you can create custom Activities from within the Content Drawer.
- To do so, type out the Activity name you want to add.
- After typing, you'll be given a checkbox with the Activity name entered into the search field.
- Click the checkbox, to add the custom Activity to your documentation.

Case Note Overwrite Protection
The new integrated Flowsheets prevents multiple users from opening the same in-progress note at the same time to prevent one user from overwriting the notes of another.
For example; when a case note is activley being edited by a therapist, if the therapist assistant attempts to open the case, they'll see a message that alerts them to the note being actively documented and be blocked from entering. The therapist assistant will only have the option to Leave the case and retry once the first therapist has completed documentation.

Flowsheet Activity History
There are two ways to see the history of an activity in Flowsheets:
Full History
- In the flowsheet portion of a note, click the Pencil icon to the right of the activity details.

- A panel will open on the right side of your screen where the activity history will appear.


Recent History
Alternatively, hover your mouse over the activity to see the last 5 days it was performed. 