Worldpay - Account and Device Setup
Easily accept credit card payments directly from the scheduler or the patient’s chart with a fully integrated processing solution. You'll have the ability to run a credit card when you check a patient in—or at any point—providing a hassle-free workflow and more time to treat patients. WebPT has partnered with Worldpay from FIS—an industry leader for payment processing—to offer this service. You must be credentialed with Worldpay from FIS before you can use this solution.
The solution is Fully integrated with the scheduler and patient chart and allows Patient payments to flow directly into integrated billing solutions such as Therabill, saving you time on reconciling payments.
Worldpay Device Upgrade
WebPT EMR Members already using the integrated Worldpay solution order your Ingenico Lane/3000 Device here
IN THIS ARTICLE
Worldpay | Account Setup Process
Because this is an integrated solution, you must sign up with Worldpay from FIS and be approved before you can begin using the integrated credit card processing capability in the EMR. This chart shows the process and who is responsible at each stage. 
Ingenico Lane/3000 device | Information
The Ingenico Lane/3000 device accepts contactless and chip transactions and the traditional swipe functionality. The device is connected via ethernet to your clinic's network by a router or ethernet wall port. All computers on the network will be able to access this device, it does not have to be plugged into a specific computer to be used. Once the device is connected and powered up it will display an activation code that needs to be entered in the Clinic Settings.
Ingenico Lane/3000 device | Network Information
You may need to review the network configuration for inbound and outbound HTTPS traffic can reach the following URLs.
- https://tripos.worldpay.com HTTPS on port 443
- https://device.tripos.vantiv.com TCP on port 9001
- Enable TCP/IP TLS v1.2 protocol for https://device.tripos.vantiv.com
Ingenico Lane/3000 device setup | Add the device to the WebPT EMR
Once your device is plugged into your network terminal, you will need to add it to the WebPT EMR.
- Power the device and connect the ethernet port to your router or wall.
- From the Clinic dropdown (Clinic Name) click Clinic Settings.

- Locate Payment Device Settings and click Add Device and Confirm your Worldpay Merchant ID.


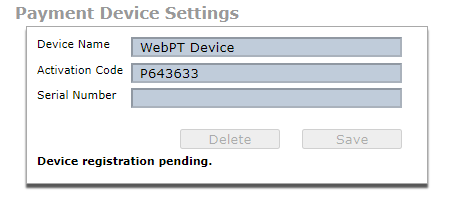
- Enter the Device Name (64 characters; only alphanumeric characters, Do not duplicate device names as they will not be accepted). When multiple devices may be used label each device to identify the name of the device used in your clinic, you might consider a naming convention that speaks to the location of the device such as Front Office 1, Front Office 2, etc.

- Enter the Activation code and click Activate. This process may take up to 2 minutes.

- The device will receive the WorldPay confirmation and then will reboot.
- While the device is processing the activation and registration you may see a note at the bottom of the device window “Device registration pending.”
- The serial number will automatically populate once the activation process is complete and a confirmation message will appear.
- You can only add one device at a time.
- Once your device has been added and activated you can begin taking payments. Read more about Processing a payment.


ID Tech SREDKey Device | Computer Setup
Some anti-virus software cause issues with the ability of the EMR to read the input of the swiper. We recommend adding the following URLs to your anti-virus program.
XML
https://transaction.elementexpress.com
https://reporting.elementexpress.com
https://services.elementexpress.com
If you do not, you’ll receive an intermittent Unable to read input. Waiting for Retry error when trying to process transactions.

ID Tech SREDKey Device | Information and Setup
The ID Tech SREDkey MagStripe Card reader legacy device used in some clinics has an encrypted keypad with an encrypted MagStripe card reader and connects to your computer via USB cable.

ID Tech SREDKey Device | Setup
Setup is as simple:
- Plug the USB cable into the computer’s USB port. The device will automatically install the necessary drivers in less than a minute.
- The screen on the device will read “Swipe Card or Key-in Card Number” when it’s ready to go.
ID Tech SREDKey Device | Configuration
When manually keying in card information, there are six available configurations (usually detailed in the QuickStart Manual that you received with your device). These configurations determine how much information is required to be input for the device to process the credit card.
We recommend using Configuration #4. This requires the entry of the Card Number, Expiration Date, Security Code, and Zip Code.
| Card Configuration | Card Information |
| Configuration 1 | Card number, Expiration Date |
| Configuration 2 | Card Number, Exp Date, Zip Code |
| Configuration 3 | Card Number, Exp Date, Street Number of the Address, Zip Code |
| Configuration 4 | Card Number, Exp Date, CCV, Zip Code |
| Configuration 5 | Card Number, Exp Date, CCV, Street Number of Address, Zip Code |
| Configuration 6 | Card Number, Exp Date, CCV |
Use the following steps to change the configuration.
- Press the #Admin key.
- Press the number corresponding to the configuration you want to use. Following the recommendation, we’ll select 4.
- Press the Enter key to complete the configuration.
ID Tech SREDKey | Key Functions
We’ll quickly define the functions of each of the major keys. This information is also included in your QuickStart Manual.
| Button | Function |
| Clear | Pressing the Clear key allows users to remove all entered data at the current input level. The current transaction would not be canceled. |
| Cancel | Pressing the Cancel key once allows users to remove all input in the current as well as the previous level. The device then goes back to the previous prompt of the current transaction. If the “Cancel” key is pressed twice, the current transaction would be canceled and the device goes back to the initial mode. |
| BS | Pressing the BS (backspace) key allows users to remove the entered data one character at a time. |
| #Admin | Pressing the #Admin key when the screen displays Swipe or Key-In Card Number or Enter Card Number then press Enter allows the user to enter the Admin Menu. Pressing the #Admin key on other screens puts the device in Help Mode. |